


Olivia loves the play makeup I made her. Whenever I'm getting ready, she rushes in, asking for her makeup. I had been keeping it in my own makeup bag, but I thought it was only right to make one to hold her new stash. And in the meantime, I made one for me, too. Plus, it was just another reason to break out the sewing machine!

She's still only allowed to play with her makeup if I'm watching. I just don't want her to lose the tiny brushes somewhere around the house, just begging for her baby brother to find (and eat) them. Since Mother's Day is just around the corner, I couldn't resist to share this fun tutorial with you.

This is one project you can do for yourself or a friend, and enjoy the finished product with your favorite little gal, no matter how young or old she is.

These bags hold so much more than I expected. I don't wear much makeup, really, but both bags have so much more room than I need. And the little ones could fit a bunch more faux makeup containers and brushes.

And one of the best parts? The inside is just as pretty as the outside! Since I hate ugly, visible seams, I made these so that every seam faces in towards the wrong side of the fabric. And you never see them. Score.

They're as cute as can be.

They have fun, boxed-out bottoms, which helps them to stand up on their own.

And they really do hold the perfect amount of goodies inside.

Plus, I may have snuck in an extra one for a certain Minnie Mouse-loving niece of mine. She'll need some play makeup, too. Shh!! It's for Christmas. Yes, the earlier, the better in my book!

Want to learn the low-down on how to make them?
Let's get started.
WHAT YOU NEED FOR THIS PROJECT:
* (1) 7" zipper (or longer) [for each bag]
* (2) pieces of 7.5"x7.5" outer fabric [for the adult size] AND/OR (2) pieces of 6.5"x7" outer fabric [for the child size]
* (2) pieces of 7.5"x7.5" lining fabric [for the adult size] AND/OR (2) pieces of 6.5"x7" lining fabric [for the child size]
* (1) piece of 3"x4" fabric for the small tab [for each bag]
* (1) piece of 9"x4" fabric for the handle [for each bag]
* Coordinating Thread
* (2) pieces of 7"x7" iron-on fusible interfacing [for the adult size] AND/OR (2) pieces 6"x6.5" iron-on fusible interfacing [for the child size]
*Ruler
*Disappearing Ink Sewing Pen
If you're a visual person, like me, I have prepared some pics to help you out. The first photo shows the adult size fabric pieces.

Then, we have the child size fabric pieces.

After you have your fabric pieces gathered up, cut and iron on your fusible interfacing to the wrong side of your outer fabric. Follow the directions on your interfacing label closely. There is no need to add interfacing to your lining. The interfacing will give the bag the structure it needs.

The brand I use is Pellon 931TD Fusible Midweight interfacing. It requires that you use water in your iron, spray soak the area, then iron it on. Here's my little tip: Since it can be easy to mistake the fusible side of the interfacing with the opposite side, I use a trick to keep from having a mishap. If you iron the interfacing with the fusible side up, it will stick to the iron. This is no fun. So, I use a ratty old t-shirt, which is designated just for this purpose, and place it on top of my work. Then, I spray soak the t-shirt, with my fabric underneath, and iron until my interfacing is fused.
We'll begin with the tab and the handle of the bag. These are optional, but they do help little fingers grab onto something while opening the zipper. Start by ironing both pieces in half, going from a 4" wide piece to a 2" wide piece. This pic shows the fold opened up.

Then, iron both sides in toward the middle. I have the longer handle piece opened up to show you the three folds.

Fold the pieces down to 1" size with raw ends inside, then pin if you like. I usually don't, but I have shown you how, here.

Here's a great tip if you have never used a sewing machine: Every time you start to sew, make sure to hold down your threads for the first stitch. If you don't do this, the thread will most likely slide back out of your needle. Then you'll have to thread it all over again. Yuck. So in this instance, I'll hold my threads with my right hand, and guide with my left.
For purposes of this project we will always backstitch at the beginning and the end. Sew down the 9" side of the handle with a 1/8" seam allowance.

Sew down the opposite side. Then repeat with the smaller tab piece. You'll sew the 3" sides of the tab. When you're finished, you should have a 1"x9" handle and a 1"x3" tab. Ironing these flat after sewing makes a big difference in how nice they look later on.

Next, it's time to make a "zipper sandwich." And no, I did not make up the term. It's actually what you call it. :) DON'T BE SCARED! I promise it's easier than you think.
First, place your lining fabric right side up. I apologize, as the lining I chose for both bags doesn't have a right or wrong side. They both look the same on each side. But trust me. You'll start with the fabric right side up, then you'll place your zipper on top.
Place the zipper right side up. Line up your zipper across the top of the lining fabric. Then, line up your zipper with the end of your fabric. See how I've done it on the right side.

Next, place your outer fabric wrong side up on top of the zipper. Line up the fabric across the top of the zipper.

Next, we'll pin the "sandwich" together, before sewing.

Get your zipper foot out, and let's get started! Most sewing machines come with this foot, but if yours doesn't, it looks something like this. I have seen them look slightly different, but all serve the same purpose. Mine is made so that I can clip it to the machine either to the left or the right. This makes it nice, so that I can sew with the zipper on either side.

You can see here that I will be sewing with my zipper to the left of my foot. So I have clipped my foot on the left side, and have placed my thread so that it goes under my foot, and off to the right.

Whenever I'm sewing a zipper, I like to start on the end opposite the zipper pull. You can see that my zipper is longer than I need, facing away from me, and so the pull is closer to me.
Scootch your zipper foot as close as you can to the zipper, without sitting on top of it. It may take a few tries to get the zipper stitch right for beginners (i.e. sewing into the teeth), but that's why we have our handy dandy seam rippers. :)

Start sewing along the side of your zipper, making sure to backstitch a few stitches at the beginning. We'll later do this at the end, too.
When you get close to the zipper pull, stop. We're going to move it. Make sure your needle is down, into the fabric. If the needle is up, everything will move and get all wonky for our next step.
Lift your foot to the up position. You can see here that we'll be holding the foot as high as it will go, for purposes of moving our zipper pull out of the way.

Hold your zipper foot out of the way with your right hand, then carefully slide the zipper pull open...

...past the foot, and out of the way.

Now, line your fabric up again. Put the foot back down, and finish sewing down the line, making sure to backstitch at the end.
Fold open both the outer and lining fabric pieces, so that they are facing wrong sides together. Then iron them, nice and crisp. Be careful not to have your iron too hot, and accidentally melt your zipper. Yikes.

I didn't get a pic while I was sewing it, but you can see here that you'll want to topstitch close to the zipper in the next step. See that small line of stitches? Those are my topstitching stitches. I can't stand it when fabric gets caught in a zipper. This topstitching solves that problem. It also looks pretty.

Next we'll make a "zipper sandwich" on the other side. Place the lining fabric right side down, which will face your already sewn lining fabric, matching it up across the top and the end like we did before. The piece sewn in should be facing right side up.

On the opposite size, you'll place your outer fabric right side down, where the other piece of outer fabric is right side up beneath it.

Here is a better picture of the entire sandwich. I am pinching the two pieces we started with. Then for this second side of the zipper, you'll have the lining pieces facing right sides together, and the outer fabric will also be right sides together.

Sew this just like you did the first time around. I have moved my zipper foot to the other side, and my threads are now under my foot and to the left.

Iron, then topstitch this side, just like the first.

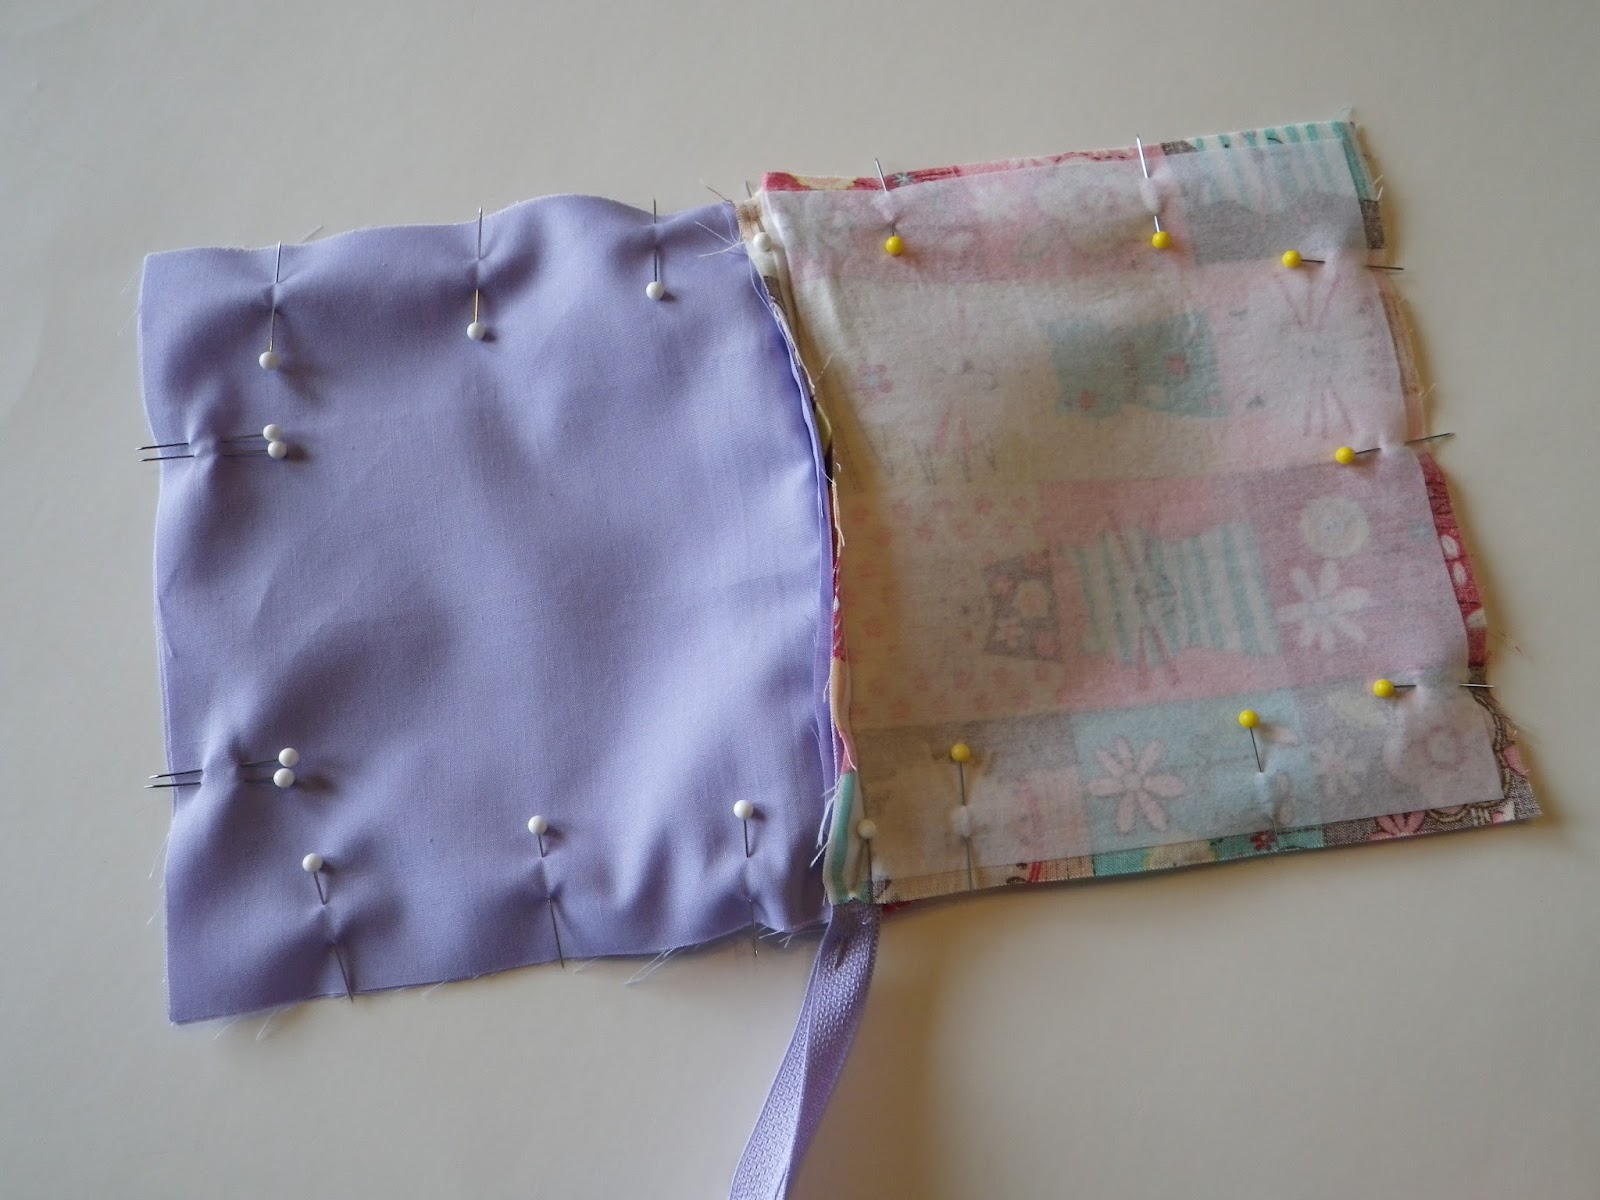
Now, open up each side, and fold the outer pieces with right sides together, and the lining pieces with right sides together.

We'll start by pinning the lining pieces, once again right sides together. See those double pins I've placed close together? These are the start/stop points for this process. We'll start where the double pins are on the right, sew around the corner, continue around the entire bag, then finish at the double pins on the left. Pin your start/stop points 2-3" apart. You'll need these 2-3" for turning right side out, later.

BEFORE YOU CONTINUE : UNZIP YOUR ZIPPER ABOUT 3/4 OF THE WAY OPEN! If you forget this step, and sew your bag with the zipper closed, it will be difficult, if not impossible to open up when we turn it all right side out. I love my seam ripper, but not that much.

Continue pinning around your bag. I like to fold the zipper down and pin it in place, too. In this pic, it is folded toward the left, with the fold on the right.
Now, if you are inserting the tab and/or handle, this is the time to add them, before you sew it all shut. Placement is up to you, but I like mine to line up close to the top. To do this, take out a pin on the side where you'll be placing the handle...

Fold your handle in half, pinning for help if you wish...

Then insert, loop side first, into the outer fabric side...

And finally, line up with a little sticking out OR flush with the side of the bag, and pin. I like a little sticking out, so that when I sew, I know it is for sure going to stay in place.

Repeat this step for the tab, on the opposite side. Remove one pin, near the top. Fold the tab in half, pinning if you wish...

Insert the tab, folded side in...

Line up and pin in place.

So now, we're prepped and ready to sew! Woohoo!
We're going to start where I talked before about my double pins. The double pins on the right are the starting point. Using a 1/4" seam allowance, start here, making sure to backstitch. Turn around the corner, and keep sewing...

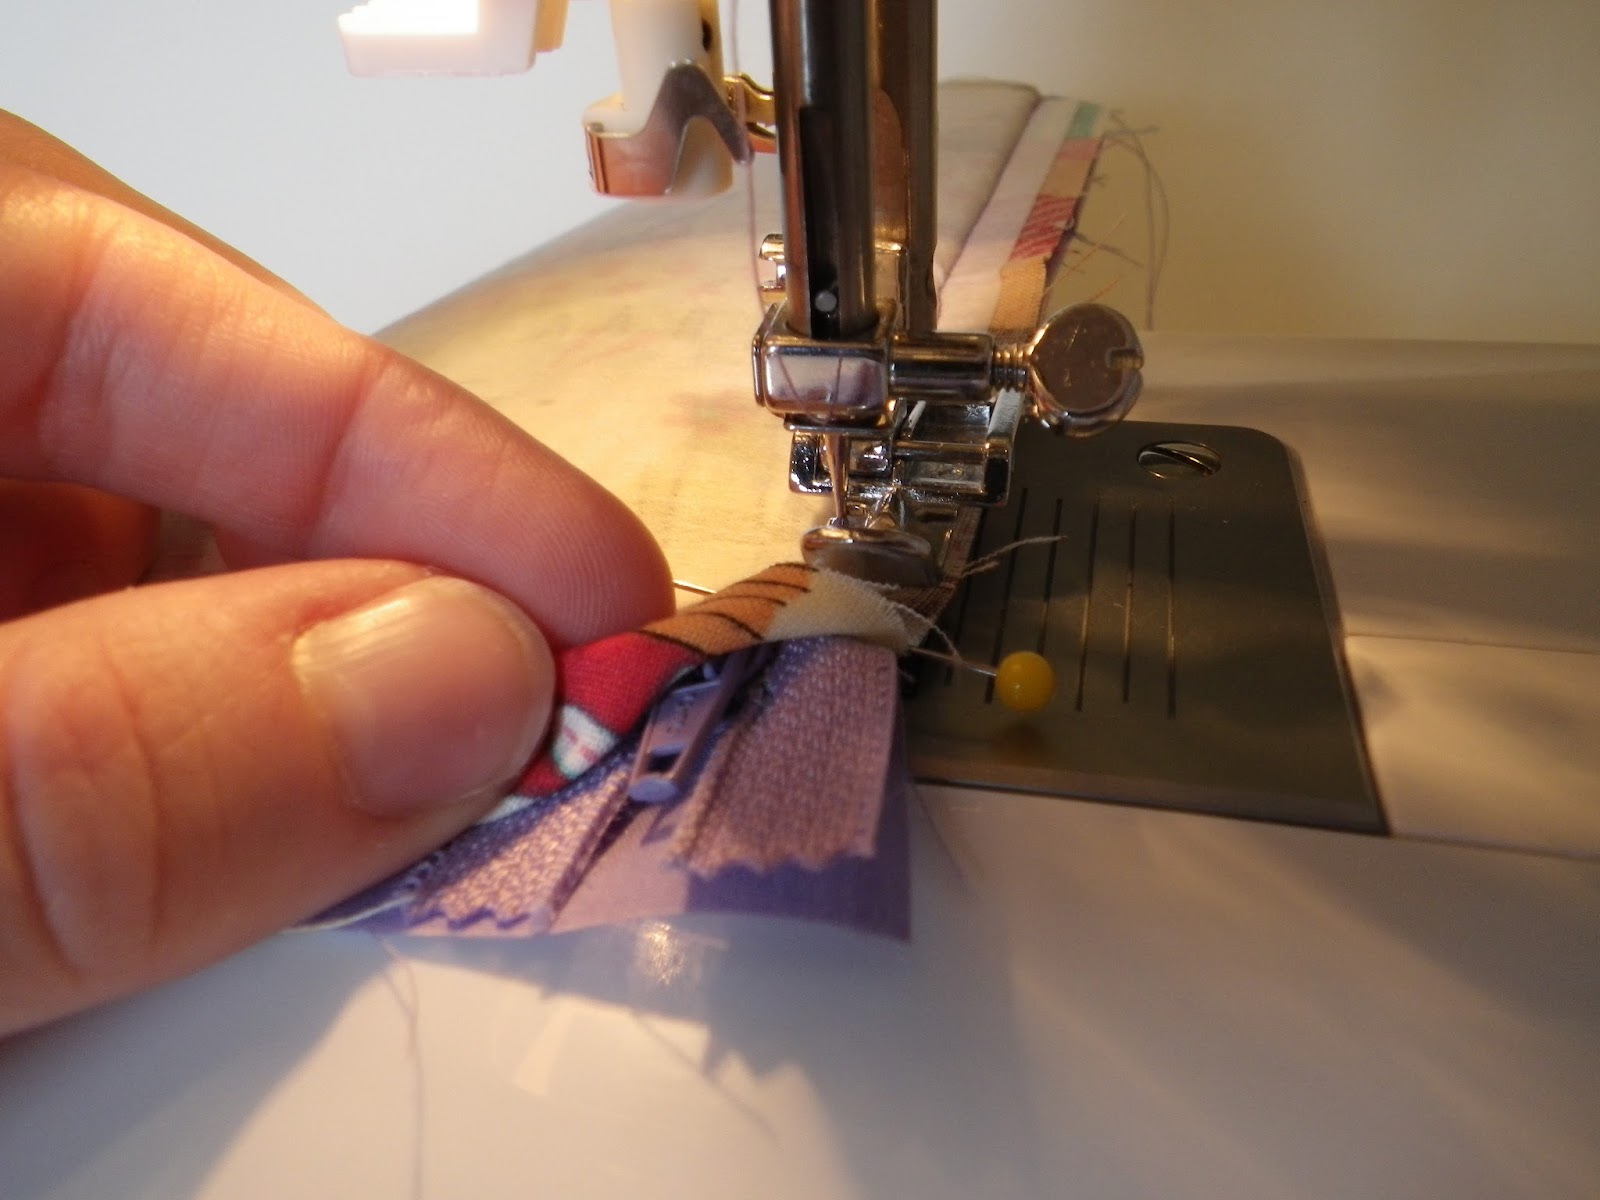
...Until you come to the zipper and tab or handle. Slowly sew across these, being careful not to break your needle. I've done this by accidentally sewing on the small piece of metal/plastic on the zipper that stops the pull on either side.

Once you sew across the zipper and then the tag or handle, backstitch all the way back before the zipper. You can even do this once again, if you are concerned about it holding up. Continue by moving forward again, sewing down this side to the corner. Turn the corner and sew along the bottom, then turn the corner and sew along the side...

Now we're on the opposite side, ready to sew the other tab or handle and zipper. Slowly sew across these, then backstitch all the way back to before the tab or handle. Continue sewing across this side...

Turn the corner and stop at the double needles. Make sure to backstitch. Clip your ends and admire your work. :)

You can now clip off any extra zipper length from your bag. The zipper is now secured, since we did the backstitching on both ends.

Now, it's time to box out our bottoms. Start with one outer point, pull your fabric away from itself and fold it to a point, matching up the sewn lines, vertically. Now pin in place.

Repeat for all four corners.

Next, we'll mark a two inch line on each corner. I like to pull out "Ol' Trusty Rusty," my favorite ruler. It's actually an L shaped ruler, with no real rust issues, but it's old. I also use Rusty to guide my rolling cutter. Good ol' Rusty...
See how Rusty is lined up, below. Place your ruler with any inch mark on the stitch line. The 3" mark is lined up, below. Then move up or down the stitch line until exactly one inch to the left and right meet up with the fabric folds. Rusty is showing us the 2" mark on the left side and the 4" mark on the right side. Thanks, Rusty.

Pull out your disappearing ink pen, and mark a line straight across your ruler. You rule, Singer pen.

See the pretty line? Sigh. So easy.

Now, sew right down this line. Could it get any easier? I love it. Make sure to backstitch at the beginning and end every time.

Here's my sewn corner. And yes, my bobbin ran out of lavender thread just at this point. I didn't need another bobbin with this color, so I didn't see any point in re-threading it. Welcome back, white thread.

Now, clip off this corner, fairly close to your stitches.

Mine is cut about an 1/8" away from the line.

Now it's time to turn your bag right side out. Stick your hand through that 2-3" hole you left open. Grab the inside of the bag. Pull through, and...

Voila! It's a bag, folks!

Now, stick your hand back in and help push out the boxy corners with your fingers.

There is just one last step! You need to close up those 2-3". Some choose to hand stitch it shut. I prefer to use my machine. Line up the two pieces, folding in the raw edges just like the rest of the seams, and pin. Sew with a 1/8" seam allowance, and you're done!

Pretty! Repeat for the next bag, and you're gonna have a giddy little lady. Trust me. When Olivia saw her mommy-made bag, she squealed, "Kitties! Can I have it?" Yes, my little doll, you may have it {and my ♥} forever. Love, Mommy

I hope you love the project, and please try it! I promise you won't be
disappointed! And as always, if you want to share a project you have made using
this tutorial, I'd love to see it! You can email me photos at
SugarMamaShop@gmail.com or link up a post you've written in the comments
below.
Happy Creating!
♥ Amanda


No comments:
Post a Comment