


St. Patrick's Day is this weekend, and while I don't really celebrate the holiday, it was a perfect opportunity to dress up my little man. Plus, I get to share all the fun with you. Today we'll learn how to make super easy Double Bowties.

This is a great project if you're looking to use up scraps of fabric. And the bowties can be altered to just about any size you like. Also, you can easily attach these to your favorite style hair clip, like an alligator clip, and let your little girl wear one, too. Trust me, they're adorable both ways.
And when you attach one to a onesie, you might just sqeal like I did! {Tutorial for the outfit can be found here}

And when you attach one to a onesie, you might just sqeal like I did! {Tutorial for the outfit can be found here}

The ties in my tutorial were made to fit a baby. Mine's 8 months old (nearly 9 months, sigh). The finished measurements for the bowties are 2" x 4". I needed to make two bows, since I wanted a matching one for my daughter's hair. For two bows, all you'll need is a piece of fabric that is 4.5" x 20". That's it!

After you cut the pieces for two bowties, you'll end up with (2) 4" x 4.5" pieces, (2) 4.5" x 4.5" pieces and (2) 2.25" x 3" pieces.

 Fold your top and bottom bow pieces down {right sides together} and iron across the 4.5" side, so that you end up with (1) 2" x 4.5" piece and (1) 2.25" x 4.5" piece. Fold in and iron both 3" sides of your middle tie piece {wrong sides together}, so that you end up with a piece that is about 3" x 0.75".

Now comes the fun part: Pull out your sewing machine! Use some coordinating thread and sew the pieces, using the photo for help. For the middle piece, stitch along the short 0.75" ends with 1/4" seam. There will be a raw end along the long side, but this will be hidden when you assemble the bow tie. So just sew the short ends, and this will be good enough.
For the two bow pieces, you will leave the folded end alone. Sew all the sides (except the folded edge) using a 1/4" seam making sure to leave a gap in your stitches so that you can turn right side out. I left about 1.5" for turning, and this was perfect. Make sure to backstitch each time you start and finish a line of stitching, so that your stitches don't come undone when you are turning them right side out.

After you are finished sewing, you're through with using the sewing machine. The rest will be hand-stitched. Clip your corners, making sure not to clip any stitches. This makes the finished product look much nicer.

Then before turning, I like to do one more trick. By folding down and ironing the longer side with the opening, you'll have a clean edge along that open hole when you turn it right side out. Fold down both sides (wrong sides together), using the stitch line as your guide, and iron flat.

Now, turn your bow pieces right side out, using someting pointy (but not too sharp) to help with the corners. I like to use a small crochet hook. A pencil works just the same way. Iron all your pieces nice and flat. And trust me, this makes all the difference in a professional, polished look.

This is an example of how your bow will be assembled. You'll stack your smaller 2" x 3.5" finished bow piece on top of your larger 2" x 4" finished bow piece, and the middle tie piece will go perpendicularly through the center. Since the finished bow pieces have 1/2" difference to their length, each side of the bottom, larger piece will show 1/4" on each side. This makes the double bowtie look more obvious.

Now comes the last part, which is the folding and hand sewing section. There are two ways I will shoe you to fold your bowtie. You can either use a 3-fold variation or a 5-fold variation. This photo shows the 3-fold variation with the teddy bear fabric bow (on top) and the 5-fold variation with the green and white polka dot fabric bow (on bottom). Both are cute. Both are simple. It's totally up to you and the look you're going for.

**First, we'll learn how to make a 3-fold variation.**
...And yes, I know I need a manicure.
Start by stacking your smaller bow piece on top of the larger bow piece. Hold them so that the opening is at the bottom. We didn't need to sew this shut, because it will be hidden later, by the middle tie piece.

Pinch the layers in the exact middle. The inside of the fold should be on the front side of your bow.


Finally, fold the bottom to meet up with the first fold, just like you did with the top. You'll have worked three folds, which will accordian front to back, to front. Move on to the needle and thread steps.

**Second, we'll learn how to make a 5-fold variation.**
...And yes, I still know I need a manicure. (I'm always taking donations.)
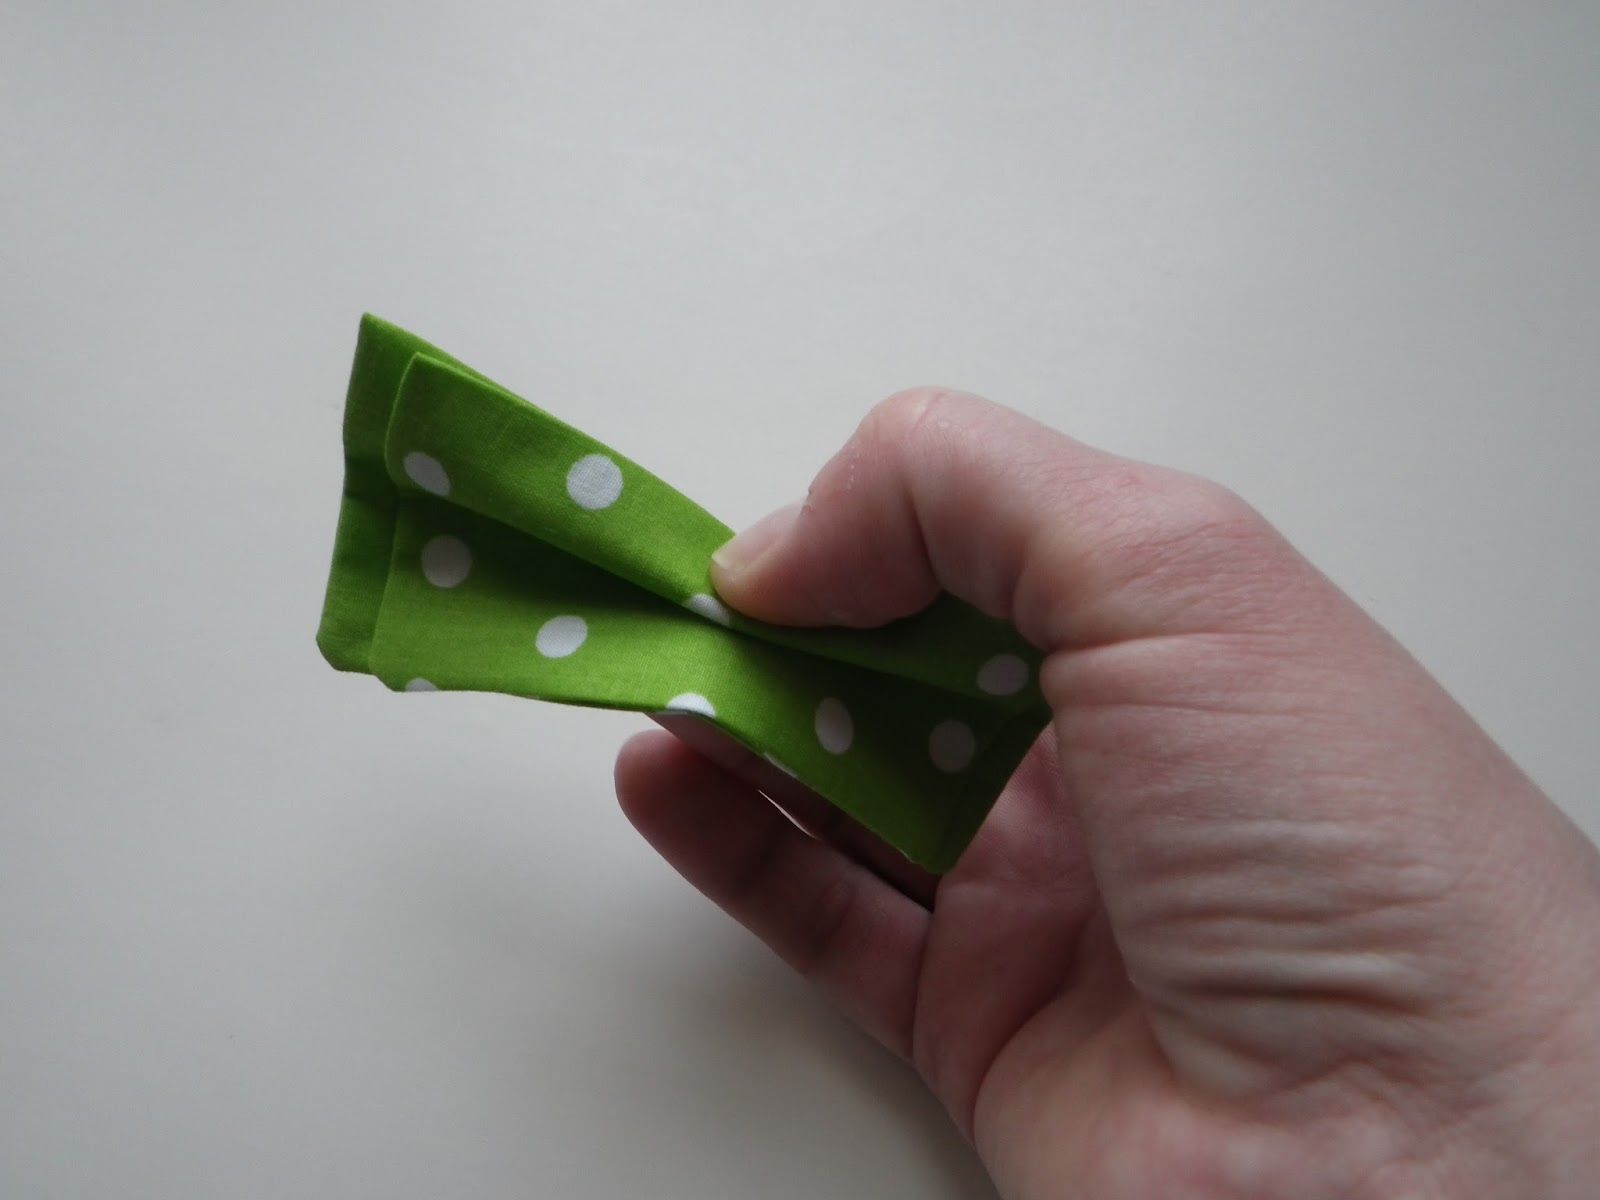
Start by stacking your smaller bow piece on top of the larger bow piece. Hold them so that the opening is at the bottom. We didn't need to sew this shut, because it will be hidden later, by the middle tie piece.

Pinch the layers in the exact middle. This time, the inside of the fold should be on the back side of your bow.


In the FINAL step, you will secure the middle tie in just a few places along the back side of the bow. Don't go all the way through to the front. Just take up enough of the fabric across the back, so that you can secure the tie to the back of the bow.


And...can you believe it? You're done!


After you cut the pieces for two bowties, you'll end up with (2) 4" x 4.5" pieces, (2) 4.5" x 4.5" pieces and (2) 2.25" x 3" pieces.

OR If you are only making one bowtie, you can cut just (1) 4" x 4.5" piece, (1) 4.5" x 4.5" piece and (1) 2.25" x 3" piece.


Now comes the fun part: Pull out your sewing machine! Use some coordinating thread and sew the pieces, using the photo for help. For the middle piece, stitch along the short 0.75" ends with 1/4" seam. There will be a raw end along the long side, but this will be hidden when you assemble the bow tie. So just sew the short ends, and this will be good enough.
For the two bow pieces, you will leave the folded end alone. Sew all the sides (except the folded edge) using a 1/4" seam making sure to leave a gap in your stitches so that you can turn right side out. I left about 1.5" for turning, and this was perfect. Make sure to backstitch each time you start and finish a line of stitching, so that your stitches don't come undone when you are turning them right side out.

After you are finished sewing, you're through with using the sewing machine. The rest will be hand-stitched. Clip your corners, making sure not to clip any stitches. This makes the finished product look much nicer.

Then before turning, I like to do one more trick. By folding down and ironing the longer side with the opening, you'll have a clean edge along that open hole when you turn it right side out. Fold down both sides (wrong sides together), using the stitch line as your guide, and iron flat.

Now, turn your bow pieces right side out, using someting pointy (but not too sharp) to help with the corners. I like to use a small crochet hook. A pencil works just the same way. Iron all your pieces nice and flat. And trust me, this makes all the difference in a professional, polished look.

This is an example of how your bow will be assembled. You'll stack your smaller 2" x 3.5" finished bow piece on top of your larger 2" x 4" finished bow piece, and the middle tie piece will go perpendicularly through the center. Since the finished bow pieces have 1/2" difference to their length, each side of the bottom, larger piece will show 1/4" on each side. This makes the double bowtie look more obvious.

Now comes the last part, which is the folding and hand sewing section. There are two ways I will shoe you to fold your bowtie. You can either use a 3-fold variation or a 5-fold variation. This photo shows the 3-fold variation with the teddy bear fabric bow (on top) and the 5-fold variation with the green and white polka dot fabric bow (on bottom). Both are cute. Both are simple. It's totally up to you and the look you're going for.

**First, we'll learn how to make a 3-fold variation.**
...And yes, I know I need a manicure.
Start by stacking your smaller bow piece on top of the larger bow piece. Hold them so that the opening is at the bottom. We didn't need to sew this shut, because it will be hidden later, by the middle tie piece.

Pinch the layers in the exact middle. The inside of the fold should be on the front side of your bow.

Now, fold back the top end to meed up with your first fold.

Here is just another angle (from the front) of this second fold.
Finally, fold the bottom to meet up with the first fold, just like you did with the top. You'll have worked three folds, which will accordian front to back, to front. Move on to the needle and thread steps.

**Second, we'll learn how to make a 5-fold variation.**
...And yes, I still know I need a manicure. (I'm always taking donations.)
Start by stacking your smaller bow piece on top of the larger bow piece. Hold them so that the opening is at the bottom. We didn't need to sew this shut, because it will be hidden later, by the middle tie piece.

Pinch the layers in the exact middle. This time, the inside of the fold should be on the back side of your bow.

Now, fold the top end forward.

Then, fold it again, backward, to meet up with the second fold.

Fold the bottom forward, just like you did with the top.

Finally, fold it again, backward, just like you did with the top. You'll have worked five folds, which will accordian front to back, to front to back, to front. Move on to the needle and thread steps.

Our last step is to secure the bow into your desired folding variation, with a needle and thread. Then we'll attach the middle tie piece to finish.
Insert your needle and pull through all layers of your folded bow, directly in the center of the bow. You can see how this is done, below. The photo shows the bow from the back side.

Next, wrap your thread several times around the center to really secure the folds. Then, insert your needle and pull back through the folds, going in the opposite direction from which you started.

Tie the ends together with a square knot. I like to tie 3-4 times, just to be certain it will stay tied. Clip your ends, so that they won't show later on.

Here, you can see the finished 5-fold and 3-fold bows, before we add the final piece, the middle tie piece. Also notice that I have trimmed my middle tie ends close to the stitches. This is because they are plenty long, and I wanted to reduce bulk.

Aren't they pretty?!?

In the FINAL step, you will secure the middle tie in just a few places along the back side of the bow. Don't go all the way through to the front. Just take up enough of the fabric across the back, so that you can secure the tie to the back of the bow.

Wrap the tie around the front, and bring it around to the back again. Secure the piece to itself with several small stitches. These will be hidden behind the bow. Tie your ends together like before. Hide them by pulling under and through the middle piece, and clip them off.

And...can you believe it? You're done!

Some great ideas for the bowties include adding them to clothing, making hair accessories out of them, attaching them to necklaces, handbags or scarves, or even dressing up shoes! Oh, the possibilities are endless! I hope you have enjoyed the tutorial, and please let me know what you think!
And if you want to share a project you have made using this tutorial, I'd love to see it! You can email me photos at SugarMamaShop@gmail.com or link up a post you've written in the comments below.
Happy creating!
♥ Amanda


Thank you.This blog is very nice.
ReplyDeleteহেয়ার স্টাইল
You have created this content tremendously. Meantime, you can read about the significance of the Sun in First House.
ReplyDeleteSun in Eighth House | Sun in Ninth House | Sun in Tenth House | Sun in Eleventh House | Sun in Twelfth House