Pages

Wednesday, November 20, 2013

Handmade Highlights, Month by Month

 
I haven't posted since July, but I've had many ideas swirling around in my head for this blog. You see, I don't like to blog about my daily activities, since I have just as much time in my day as you do. I do like to read other blogs, but forcing myself to sit down and write what is on my mind is what sometimes takes a little effort. So instead, I try to sit down and post about a new project or something I'm really into.
Besides the usual, albeit boring, tasks we do each week, I have had some creative fun here and there. So let me share a few things that I've been up to. I left off in JULY, where we returned from our annual family vacation. My son had just turned one. My daughter then turned 3 at the end of the month.
In AUGUST, we took an unexpected second trip to the coast for my sister-in-law's wedding. It was my first beach wedding experience and it was wonderful spending time with family members we didn't see the first visit.
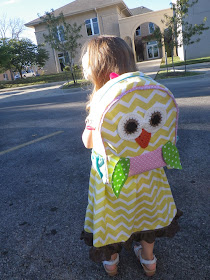
In SEPTEMBER, Olivia started preschool, which she absolutely loves. Here she is on her first day of school. I made her a little dress and headband to match.
She's also holding two apple pins for her teachers. We spent a lot of time at the library this summer, where I found the sweetest little book, Heart-Felt Holidays: 40 Festive Felt Projects to Celebrate the Seasons. I attached brooch pins to the back, embroidered "From Olivia 2013" to the back, and also embroidered each teacher's name on the front. They were adorable.
A matching backpack was the last thing I made for her. You can find the backpack tutorial I followed here, though it is slightly altered in size. It had to be a little bigger, so that it would hold papers and a folder.
And, of course, it had to have something crocheted on it! You may recognize the eyes and beak from Mamachee's Killian's Owl Hat pattern. She's a sweet friend of mine, that lovely Tara Murray.
In OCTOBER, I designed the Witchy Hat Table Centerpiece crochet pattern...
and the Witchy Hat in 6 Sizes crochet pattern.
Then I made Halloween costumes for the kids. Here they are as Little Red Riding Hood and the Wolf. (Clicking on the photo will show a much larger, clearer view).
This photo was taken by Timeless Reflection Photography & Studio. So cute with my little man giving a GROWL!
 
In NOVEMBER I designed the Frostbite Mittens crochet pattern, which are available in all of my shops (Etsy, Craftsy & Ravelry) as a 2 for 1 combo, along with...
the new Despicable Me Minion (Inspired) Mittons crochet pattern.
 
It has been a busy and fun several months. And as the Farmer's Almanac claims, we could be looking at a nasty winter. So I look forward to designing so many more patterns to share with you, since we're certain to be snowed in for a while. In the meantime, Happy Crocheting!

Friday, July 5, 2013

There's No Place Like Home

Wow! What a vacation! 15 days, 2,750 miles, several get-together's, a 1st birthday party and a beach view was what our little family just experienced. The most important part of the trip? We celebrated this little guy's first ever birthday and it was so great.
Needless to say, I think we need a vacation from our vacation. As Dorothy says, "There's no place like home." Our little travelers did so well over 4 full days of riding in the car, during different parts of the trip. At each new location, they also took to their new sleeping places well. It's a lot to ask of a one-year-old and a nearly three-year-old, but they did it, and with little complaints.
 
I love these moments and can only hope to be blessed with a long life filled with many more. Now, I look forward to putting pen to paper and sharing all of my new ideas and patterns with you. We'll talk soon!

Monday, June 3, 2013

Sleeping with the Fairies

In just 12 days, we'll be leaving for a two week vacation. We try once a year to visit my husband's side of the family. The drive is about 12 hours to our first destination. Halfway through our trip, we go North, another 6 hours. And finally, our trip home is 16-18 hours.
Needless to say, I've been working frantically at finding things to keep my nearly 1 and nearly 3 year old kiddos entertained during the trip.
I had just enough fabric to make my daughter a Tinkerbell pillow case. She and her brother were Tinkerbell and Peter Pan, last Halloween. She just started using it and she loves it. And so when we leave, she'll have a little piece of home with her. You may recognize this fabric, if you saw my Waterproof Snack Bags tutorial.
And since I can't leave well-enough alone, I added a pretty crochet edging to it last night. I finally got a chance to try out my Sharp Crochet Hook.
This was my first attempt at a pillow case, and I was literally shocked at how easy it was. And when I held it up to the pillow case I patterned it after, it was exactly the same size in every way. Maybe I'll do a pillow case tutorial next?

Thursday, May 30, 2013

Waterproof Reusable Snack Bags {A Tutorial}

 
I have been planning for our summer vacation, with an attempt at making our trip a little easier. Today, I have made waterproof reusable snack bags.
I made these bags with an amazing product I was lucky enough to find on a trip to the store. It is called Iron-On Vinyl, and it's from the popular brand, Heat 'N Bond. Therm-O-Web makes this product and I absolutely love it! I bought mine at Wal-Mart by the yard, but the 2 yard pack from Therm-O-Web would have been perfect for the amount of bags I made.
I don't have to say much about these bags. Because, well, they're awesome. You fill 'em up. They empty 'em. You wipe 'em out. And then repeat!
And since they take just a small amount of fabric and a short amount of time, you can whip up a bunch easily. I made a half dozen, so that both my son and daughter had three each. 
Want to make some of your own?
 
Let's get started.

Wednesday, May 1, 2013

Peek-a-boo Lace Socks {A FREE Crochet Pattern}

 
I have a freebie to share with you today: my Peek-a-boo Lace Socks Crochet Pattern!
These were a blast to design. And they're even more fun to wear. Wear them under a pair of pumps for an instant "Sexy Librarian" look!
These socks are a little tricky if you are a beginner. I wouldn't suggest them for your first project. The reason is that you'll use a large hook with thin, crochet thread, and keeping the correct gauge is difficult unless you have a little experience under your belt.
 
The large loops created by this hook and thread combo give them a stretchiness that helps them to span several shoe sizes. Although the pattern makes two sizes, each size spans about 4 shoe sizes. The small size fits around US Sizes 4-7. The large size fits around US Sizes 8-11. So no matter your shoe size, you should be able to make a pair that fits!

Tuesday, April 30, 2013

May 2013 Giveaway

 
It's time for a Giveaway, a chance for me to thank all of my loyal readers and fans for sticking with me. And for the 5th month of the year, I'm giving away a free crochet pattern of choice to 5 winners.
Entry is EASY! Good luck, everyone. You guys rock!
You can find the Rafflecopter entry form after the jump...
 
♥ Amanda

Thursday, April 11, 2013

Matching Mommy & Me Makeup Bags For Mother's Day [A TUTORIAL]

  
Olivia loves the play makeup I made her. Whenever I'm getting ready, she rushes in, asking for her makeup. I had been keeping it in my own makeup bag, but I thought it was only right to make one to hold her new stash. And in the meantime, I made one for me, too. Plus, it was just another reason to break out the sewing machine!
She's still only allowed to play with her makeup if I'm watching. I just don't want her to lose the tiny brushes somewhere around the house, just begging for her baby brother to find (and eat) them. Since Mother's Day is just around the corner, I couldn't resist to share this fun tutorial with you.
This is one project you can do for yourself or a friend, and enjoy the finished product with your favorite little gal, no matter how young or old she is.
These bags hold so much more than I expected. I don't wear much makeup, really, but both bags have so much more room than I need. And the little ones could fit a bunch more faux makeup containers and brushes.
And one of the best parts? The inside is just as pretty as the outside! Since I hate ugly, visible seams, I made these so that every seam faces in towards the wrong side of the fabric. And you never see them. Score.
They're as cute as can be.
They have fun, boxed-out bottoms, which helps them to stand up on their own.
And they really do hold the perfect amount of goodies inside.
Plus, I may have snuck in an extra one for a certain Minnie Mouse-loving niece of mine. She'll need some play makeup, too. Shh!! It's for Christmas. Yes, the earlier, the better in my book!
 
Want to learn the low-down on how to make them?
 
Let's get started.

Monday, April 8, 2013

"Stay Put Bookmarks" via Make It & Love It {Here's what I made today}


Today was "cutting day." I ran across a great idea on Positively Splendid. It was one of those, "Why didn't I think of that?" moments. The idea was for a way to make my life easier, by organizing my crafting plans. So for the day, I cut fabric for several projects. Then I organized them, all ready to be sewn.
 
The theory is correct. Cutting fabric is the most tedious part of sewing. After this, the fun part begins. I can't tell you how nice it is to have a ton of things all lined up, and ready to be sewn. And by the end of the night, I had just enough time left to sew these Stay Put Bookmarks. You can see Ashley's brilliant process here, at Make It & Love It.
 
The camo bookmarks are for my bookworm Dad-In-Law. The polka dot bookmarks are for surprise gifts. :) They're easy, fun, simple and brilliant! Make some today, too!
And, I always have to add my tag. I love the personal touch it gives. Plus, my friends and family will always remember who made it.
I borrowed one of my daughter's Easter gifts to show how they work. Gotta love that first read and learn Bible! :)
These are so much fun. I had to resist making a dozen more!
 
Happy Creating!
 
♥ Amanda

Monday, March 25, 2013

How to Make Bunny Masks {An Easter Craft} TUTORIAL

 
Today, I want to share with you an easy tutorial for making cute bunny masks. They're fun and adorable. They're perfect for Easter, too!
 
You need only a few basic supplies to make these masks. And in minutes, your kiddos will be enjoying them. These will be going in our Easter baskets, next weekend. I also included adult sizes with the pattern. I think they would be so fun for all the family to wear in photos.
 
Let's get started.

Sunday, March 24, 2013

10 Things You Didn't Know About Me

 
Today is cold. It's very cold. There has been snow coming down since last night, and it is supposed to continue through tonight. This is our 3rd big snow storm of the year. The first two were within a week of each other, and dumped a total of 22" on us.
 
Since I'm so cold, I thought I'd sit down and let the laptop warm up my legs. And once I unthaw, I'll get back to business, getting this house ready for Easter weekend and family! Yay! This is just a quick post I thought I'd write, to share with you some things about me. I don't share much about myself, so I thought this was a perfect opportunity to do so.
 
And thus...
 
10 Things You Didn't Know About Me

Thursday, March 21, 2013

{Semi} Homemade Cherry Turnovers

 
This is a recipe that popped into my head yesterday, and I couldn't wait to try it out. Do you like Pillsbury Toaster Strudel? Well these are BETTER! And you can make more of them for less moolah!
Make these for breakfast, brunch, dessert, a snack, when you're bored, when you can't sleep, when you want something sweet, when you want something fruity, when.... Well you get the picture. They are SO yum-o and I almost got a stomach ache from eating too many of them.
 
Here's how to do it:

Monday, March 18, 2013

Green Eggs & Ham Bow Tie Onesie [A TUTORIAL]


As I posted before, St. Patrick's Day was just another reason to create something cute for my little guy. I'm not into all the shamrocks, rainbows and luck, but it had to be green, of course!
One great thing about this onesie is that lil man can wear it any day, not just St. Patty's Day. It's green, yet unassuming. Besides, who can resist a baby in a bowtie?
This onesie is a combo of two types of crafting bliss: Fabric Transfers and Sewing. As I promised in my Double Bowtie Tutorial, I'll show you how to make one of your own.

Friday, March 15, 2013

The Easiest Double Bow Tie You'll Ever Make [A TUTORIAL]


St. Patrick's Day is this weekend, and while I don't really celebrate the holiday, it was a perfect opportunity to dress up my little man. Plus, I get to share all the fun with you. Today we'll learn how to make super easy Double Bowties.
 

This is a great project if you're looking to use up scraps of fabric. And the bowties can be altered to just about any size you like. Also, you can easily attach these to your favorite style hair clip, like an alligator clip, and let your little girl wear one, too. Trust me, they're adorable both ways.

And when you attach one to a onesie, you might just sqeal like I did! {Tutorial for the outfit can be found here}

Tuesday, March 12, 2013

Easter Lacing Cards for Kids -- a FREE Printable [A TUTORIAL]


Easter is coming! Easter is coming! Spring is nearly on our doorstep, family will be arriving in a couple weeks and fun is in store! I love Easter time. I'm not really the kinda person who has ever really loved the idea of Santa or the Easter Bunny, when it comes to celebrating holidays that are supposed to be surrounded around our Lord. But I'm also not a total Scrooge.
 
I'm okay with letting my toddler believe in Santa and go on Easter egg hunts. What's the harm? As long as we teach our children the real meaning for these precious days on the calendar, I welcome the fun of the other "stuff." And so in the spirit of crafting, quiet time for Mommy, and a little Eastery spin, I designed some Easter Lacing Card printables for you.

 
This is such a fun activity for kids! And when you have little bitty children, like me, it's nice to have activities for them to be able to take part in at this age.

Tuesday, March 5, 2013

How to Make Play Makeup - For Under $5! [A TUTORIAL]

 
If your little girl is anything like mine, she is totally intrigued with Mommy's makeup process. What could be 5 or 10 minutes usually ends up being 15 or 20, after I explain to her what each item is. She loves it when I rub some on her face, or what she thinks is real make up. All it takes is my finger and an imaginary swipe across the eyeshadow to keep her content. After all, little girls just want to be like Mommy. And I don't want her to grow out of that!
 
Since she's still only 2 years old, I wanted to make something for her to play with ONLY while I am putting on my makeup. So until she's a wee bit older, the play makeup will stay with me, and will come out when I'm getting ready.

You might be surprised at how easy and inexpensive this project is. I was able to buy everything at my local Dollar Tree store for $4.23, which included 0.23 cents in tax. I walked out with a blush brush, two cheap makeup containers, and a two-pack of fingernail polish. What a deal!

Here's how to do it:

Monday, February 18, 2013

When I grow up, I wanna be a pattern designer!


Where have I been? ...Creating patterns! Woo! I am so excited, I can barely stand it. It feels so great to officially call myself a pattern designer. And yes, while I'm still new at this, and only 6 patterns in, I have nowhere to go but up.
 
 
My first pattern for the year was the Ruffle Gladiator Baby Sandals.
I have added them to Craftsy and Ravelry, as well, for instant download.
 
 
My latest listing is the Crabby Baby Loafers.
They are also on Craftsy and Ravelry.
 
 
And finally....
My newest pattern has hit the stores today! This is my "Mini Kicks" Baby Sneakers pattern. :)
Here are the Craftsy and Ravelry links for the kicks.
 
I hope you ♥ them!
 
Happy crocheting!